Heading out the door? Read this article on the new Outside+ app available now on iOS devices for members! Download the app.
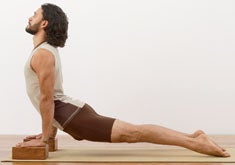
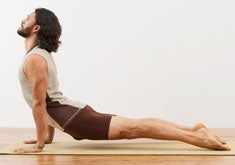
Urdhva Mukha Svanasana (Upward-Facing Dog) is an invigorating backbend that opens the chest and shoulders and strengthens the arms and legs. It’s central to Sun Salutations and is practiced repeatedly between other postures in flow classes. Linking breath to movement is important when you’re practicing Up Dog, because the breath animates and illuminates the pose and opens the heart.
Typically, you enter Up Dog on an inhalation. Take a deep inhalation now and notice how it feels: Your heart lifts, your collarbones spread, your pectoral muscles broaden and expand—movements you’ll want to accentuate in Up Dog—and you feel energized. Of course, recreating those same expansions in the pose is challenging. Students sometimes find Up Dog uncomfortable, especially in the lower back and wrists. Before trying the pose, get clear on the basic setup and then work on easing tightness in your shoulders and thoracic spine (upper and middle back). The following variations will help you find the essential actions and alignment of the pose so you can enjoy it to its fullest.
Pose Benefits:
- Strengthens the arms
- Opens the shoulders and upper back
- Expands the chest
- Tones the legs
Contraindications:
- Lower-back injury
- Wrist issues or carpal tunnel syndrome
- Shoulder vulnerability
- Pregnancy (and possible pregnancy)
Pull
If you feel achy in the lower back during Up Dog, it probably means that your upper back is stiff and your lower back is overcompensating by bending too much. With backbends the aim is to have all areas of the spine participate, not just the parts that are easy to move. If either your lower back or your neck extends too much, your backbend will not be even. If you continue these imbalances over time, you’ll put undue stress on the bendier parts. To remedy this, you’ll need to learn to open the thoracic vertebrae. To access your thoracic spine while limiting the movement in your neck and lower back, practice a modified Bhujangasana (Cobra Pose).
Begin lying on your belly with your forehead on the floor and your feet hip-width apart and parallel, toes extended straight back from your heels. Place your hands on the floor next to your lower ribs, with your elbows stacked over your wrists and the creases of your wrists parallel to the front of your mat. Draw your elbows back and in toward the midline of your body so that your shoulders lift away from the floor and your pectoral muscles spread. Firmly press all 10 toes into the floor, especially your pinkie toes, so that your quadriceps engage and your kneecaps pull up. Active legs are crucial to a happy Up Dog. When the legs are lazy, you tend to sit in your lower back rather than lengthen out of it, so really practice pressing down with the tops of your feet and lifting your thighs. Rotate the inner thighs to the ceiling (this broadens your lower back) and release the flesh of your buttocks toward the floor. Doing this decreases the arch in your lower back and creates more length. Both elements—active legs and the downward release of the buttocks—are critical to creating a backbend in which your lower back is spacious and protected.
Now extend your sternum (breastbone) forward and up. Make this happen by pulling your hands back (still squeezing your elbows in), as if you were on a scooter or skateboard trying to drag your body forward. Your hands won’t actually move back on the mat, but this pulling action will help you find the correct alignment. The heads of your shoulders will draw back and away from the floor, the trapezius (the thick muscles at the base of your neck) will release away from your ears, and the shoulder blades will press forward and into your chest, helping to open your upper back. Continue to direct your tailbone down, and see that your chin is level to the floor so that you don’t overbend in your neck. Hold for 8 to 10 breaths and then release your forehead back to the floor.
Push

For the next variation, place blocks beneath your hands alongside your lower ribs. Putting blocks under your hands gives your torso more vertical space, which helps distribute the curve of the backbend more evenly. Again, make sure that the creases of your wrists are parallel to the front of your mat. Now activate your legs and open your upper back. On your next inhalation, maintain the pulling action with your hands but now also push down so that your elbows straighten and your chest and legs lift.
Check to see that your shoulders are stacked directly over your wrists; if they’re not, adjust your feet (not your hands) forward or back so that they are. If your shoulders are in front of your wrists, the acute angle will put too much pressure on the wrist joints. This also interferes with your ability to open the thoracic area because, once your arms have passed 90 degrees, your chest collapses forward and down, causing your shoulders to round. Conversely, if the shoulders are behind your wrists, you will not be able to use your legs effectively and will end up sitting in your lower back instead of lifting up out of it (which creates space between the vertebrae). When your shoulders line up directly above your wrists with your arms perpendicular to the floor, you will be in a position to both access your upper back and lift out of your lower back.
The added height from the blocks will give you more room in which to access your thoracic spine. Press your hands firmly and evenly into the blocks, and lift your sternum toward the ceiling as you spread across your collarbones and draw the heads of your shoulders back. Stabilize your lower back by continuing to push off the tops of your feet and lift your thighs to the ceiling, as you simultaneously release the flesh of the buttocks toward the floor. Remember that the goal is to bend less in the neck and lower back; you want the thoracic spine to step up and play a role. For now, look forward and keep the back of your neck long. Use the leverage you get from the blocks to draw yourself up and out of your lower back, directing the energy of the pose into the upper back by moving your shoulder blades toward your chest to open your heart. Hold for 8 to 10 breaths and then gently lower back onto your belly.
Pull and Push

For the final pose, remove the blocks and return to your belly with your hands beside your lower ribs. Press down with all 10 fingers and all 10 toes. If your pinkie toes come off the floor, your inner thighs drop, which creates compression across the lower back. Avoid this by giving extra weight to the pinkie toes.
On an inhalation, pull your chest forward and up as you simultaneously push off your hands and feet to lift your body away from the floor. Stack your shoulders over your wrists and lift your sternum and thighs to the ceiling as you release your tailbone toward your heels. Make sure your toes extend straight back and that your feet are planted rather than being dragged along when you pull your chest forward. You want to anchor the pose so that you can explore your upper back.
Use your inhalation to make the pose blossom, take the heads of your shoulders back, and spread your collarbones and pectorals. Imagine your shoulder blades are a pair of friendly hands pressing into your chest and opening your heart, and then carefully raise your gaze so that the curve in your neck is a continuation of the curve in your upper back. Balancing the bend in your Up Dog will protect your spine. Since asana lessons often translate into life lessons, learning how to achieve this balance may also teach you to cultivate a quality of equilibrium off the mat as well.
Dog Stretch
The word vinyasa has become short-hand for the specific sequence of poses moving from Chaturanga Dandasana (Four-Limbed Staff Pose) to Up Dog and then back to Down Dog. (Vinyasa is also commonly used in two other ways: to describe a step-by-step progression from one pose to the next or to signify the concept of linking breath with movement.)
The specific three-pose sequence is common to Ashtanga, flow, and Power yoga, and many students are both challenged and mystified by it. It’s an important transition to practice and understand because, when done incorrectly, it can compromise the alignment of the poses it connects, whereas when mastered it tends to enhance and reinforce them.
The key to the transition is moving the chest and legs in opposition, which keeps the center (abdomen and pelvis) from collapsing and protects the shoulders and lower back.
When you move from Chaturanga to Up Dog, push your toes back so that they move an inch or so toward the back of your mat as you roll over them. Making your feet travel on a sticky mat requires some serious effort in your legs, which is useful since active legs are crucial to both Chaturanga and Up Dog.
As you slide your toes back, simultaneously pull with your hands (they won’t actually move) while drawing your chest forward and up, so that your upper body and lower body move in opposite directions.
Only your hands and feet touch the floor in this transition. To keep your body from sagging toward the floor, use the strength of your arms (pulling your sternum forward) and legs (pushing your toes back). To vizualize how this works, imagine holding a piece of ribbon between your hands. When your hands are closer together, the center of the ribbon droops. When you pull your hands apart, it becomes taut. The latter image is the blueprint for your transition.
Natasha Rizopoulos lives and teaches yoga in Los Angeles and Boston.